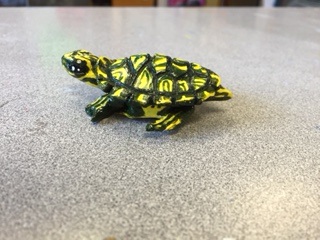
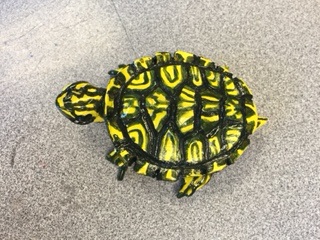
Small Animal
I made this Small Turtle out of clay. I first sculpted the underpart of the body by trying to recreate the shape of the under part of the shell. I then sculpted a circular shell and attached it to the shell by adding lines to accentuate the details of the hinges in the body plates of the turtle shell. I then smoothed and trimmed all excess edges and zones that like it had too much clay buildup. I then bisqued the clay in the kiln. After this i slightly sanded it and planned my design based on the actual colorings and lines of an actual turtle shell. Based on reference photos i saw that the baby turtle shell is highlighted with yellows and deep greens so i decided to obtain this deep of a color range acrylic paints would be the best option. So i then methodically painted the turtle with the acrylics and then painted the whole thing with a poly acrylic to give it the shine as if it was in water. If i was to do this again i would change two things. First i would make the yellow on the shell of the turtle a little less neon, this would make the turtle look a little more natural which is the optimal goal. Second i would have continued the shell down and up to meet on the sides of the body this minute detail would make the turtle look ten times more realistic.
|
|
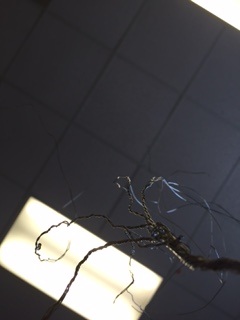
Wire Tree
Explain the process of the tree How is your tree successful and what might you change for next time?
To make a wire tree is simple, yet can be complicated if you do not have the optimal tools necessary. You will need 9-12 strands of 24 gauge wire (this will be easier if you use thicker wire) then make a large loop on each end of the strands by folding them in half and twisting at the fold making a loop. Now you will pinch and twist each loop in different sections to create the root system of the tree. Now begin twisting all the strands together to form the trunk, and when enough trunk has been acquired section off branches and twist wires together to create the branch canopy. Now that you have your branch system you can either leave your tree free standing or you can attach it to a base such as a rock. If i was to do this next time i would totally use thicker wire. During this project i used thin jewelry wire, that was also a dull steel color. Some other optimal wires would be rose gold, gold, or bronze. These colors add the the overall professional feel of the piece and would enhance the tree to a new level. Overall i would like to do this project again, i was defeated by one of my least favorite materials being wire and so hopefully in the future i can conquer the art of making a wire bonsai tree. this is the wiki link that has a step by step instruction of how to construct this tree.http://www.wikihow.com/Make-a-Wire-Tree-Sculpture
- Coming soon wire tree part 2 :) (redo)
- Coming soon wire tree part 2 :) (redo)
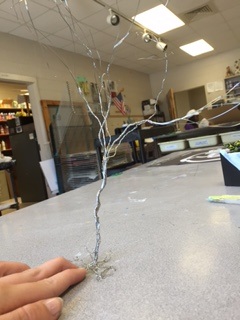
from this picture you can tell the tree is too thin
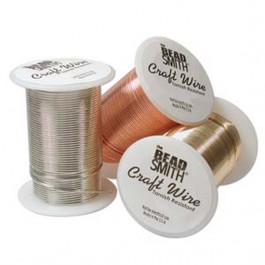
Optimal wire to use for this project
|
interesting perspective of the branches looking up
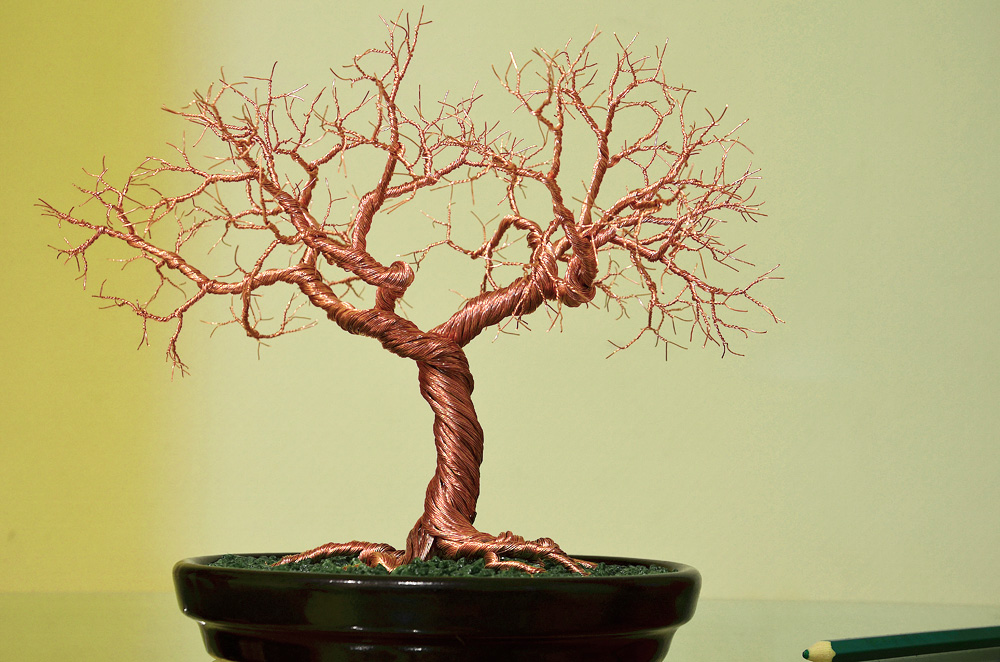
What the wire tree should look like
|
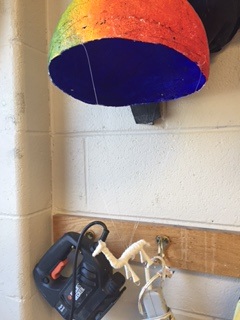
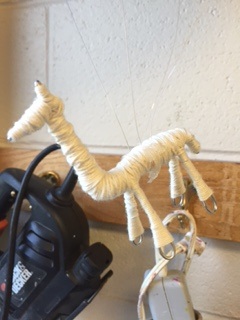
Parachute installation
Explain the process of how you made the piece. What did you think of the idea process? Is there a way you would have rather done it? What do you find successful about the installation and what would you have changed looking back on it?
This piece is made by using plaster strips, acrylic paint, fishing wire, thin yarn, and thick wire. the parachute top was made by wrapping plaster strips around an inflated balloon . after this hardened over a few days the balloon was popped and the shell was left. I sanded the large ridges of the shell off and painted a ombre rainbow onto the parachute. i then used an exacto knife to make holes in the sides and the top and strung fishing line through the sides and top. i then attached my lama made from wire and thin yarn to the end of the fishing line with hot glue to secure it in the correct position. I really enjoyed the idea making process, we collaborated as groups to come up with plans of what idea to use. we then as a class voted on the best idea, this allowed us to determine the best idea that everyone wanted. I think in the future when planning installations this is a great way to determine optimal success of an idea. I think the installation was fairly successful but if we had all done two parachutes it would have looked more full, also if we had spent more time on the parachute men the whole installation would look a little more professional. (more pictures of the instillation to come)
This piece is made by using plaster strips, acrylic paint, fishing wire, thin yarn, and thick wire. the parachute top was made by wrapping plaster strips around an inflated balloon . after this hardened over a few days the balloon was popped and the shell was left. I sanded the large ridges of the shell off and painted a ombre rainbow onto the parachute. i then used an exacto knife to make holes in the sides and the top and strung fishing line through the sides and top. i then attached my lama made from wire and thin yarn to the end of the fishing line with hot glue to secure it in the correct position. I really enjoyed the idea making process, we collaborated as groups to come up with plans of what idea to use. we then as a class voted on the best idea, this allowed us to determine the best idea that everyone wanted. I think in the future when planning installations this is a great way to determine optimal success of an idea. I think the installation was fairly successful but if we had all done two parachutes it would have looked more full, also if we had spent more time on the parachute men the whole installation would look a little more professional. (more pictures of the instillation to come)
|
|
Sgraffito tray
Explain what sgraffito is and the process of making this tray. (slab, underglaze, glazing) What do you find successful about your piece and what might you change if do it again? What did you learn from this project?
Sgraffito is a form of decoration made by scratching through a surface to reveal a lower layer of a contrasting color, typically done in plaster or stucco on walls, or in slip on ceramics before firing. The first step in this process is to roll out a 3/4ths inch slab and lay it on a plate, smooth the lumps and bumps out and allow the tray to come to the edge of the plastic tray or plate you are using. 2nd paint the desired underglaze and allow to set and dry onto plate before adding another layer. Once underglaze had hardened take a tool and etch into the plate a desired design. This can be done using a paper clip, dull pencil, or needle tool, based on the desired thickness of the white line wanted. when your design has been etched into your tray you can now bisque fire your piece. Once out of the kiln you dunk the tray into a clear glaze by doing a drip dry technique. it is now ready to be glaze fired, once this is completed your tray is fully finished. I really enjoyed this project and i feel that my use of lines was really successful in completing this piece, if i was to do it again i would probably make the eyes of the cow a little less cartoon like because i was going more for a realistic approach. I learned from this project how to be patient, many times in pottery you must be patient but especially with sgraffito because of the many tasks and allowing for cooling and heating of the pottery.I also learned the many steps on how to complete a sgraffito process that was unknown to me before. Now by knowing this i can complete intricate details with the use of an outside tool, other than painting or glazing it onto the piece itself. (more pictures of the plate to come)
Sgraffito is a form of decoration made by scratching through a surface to reveal a lower layer of a contrasting color, typically done in plaster or stucco on walls, or in slip on ceramics before firing. The first step in this process is to roll out a 3/4ths inch slab and lay it on a plate, smooth the lumps and bumps out and allow the tray to come to the edge of the plastic tray or plate you are using. 2nd paint the desired underglaze and allow to set and dry onto plate before adding another layer. Once underglaze had hardened take a tool and etch into the plate a desired design. This can be done using a paper clip, dull pencil, or needle tool, based on the desired thickness of the white line wanted. when your design has been etched into your tray you can now bisque fire your piece. Once out of the kiln you dunk the tray into a clear glaze by doing a drip dry technique. it is now ready to be glaze fired, once this is completed your tray is fully finished. I really enjoyed this project and i feel that my use of lines was really successful in completing this piece, if i was to do it again i would probably make the eyes of the cow a little less cartoon like because i was going more for a realistic approach. I learned from this project how to be patient, many times in pottery you must be patient but especially with sgraffito because of the many tasks and allowing for cooling and heating of the pottery.I also learned the many steps on how to complete a sgraffito process that was unknown to me before. Now by knowing this i can complete intricate details with the use of an outside tool, other than painting or glazing it onto the piece itself. (more pictures of the plate to come)
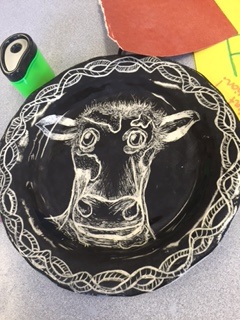
Illustration Fridays
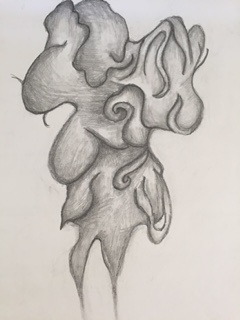
Smoke
|
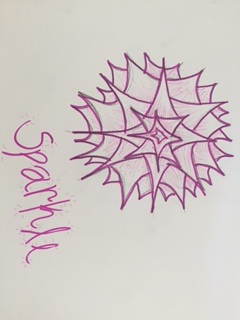
Sparkle
|
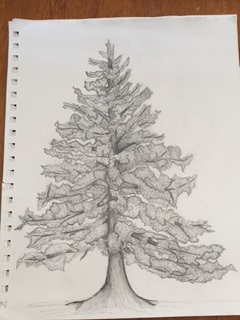
Wood
|
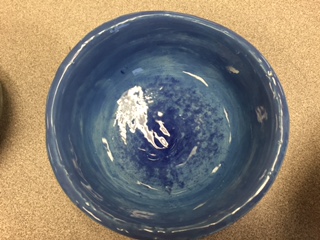
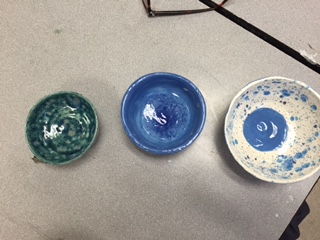
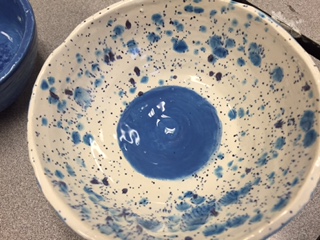
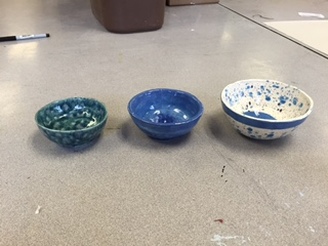
Empty bowl project
What material did you use for each bowl? Explain your process.How did the bowls turn out? What did you think about using the wheel?
For my three bowls i made all of them out of clay. I also made a fourth bowl out of clay by braiding it and then glazing it but unfortunately i wasn't able to get a picture of it before it was donated to the empty bowl project. Each of the bowls are made of clay by a process of wedging, throwing on the wheel, trimming, sanding, glazing and firing. I love all three of my bowls, especially the smallest, my favorite part of the bowls is that they all look so good together as a collection. They also nest inside one another because i made one successively bigger than the other (not on purpose :)). Another aspect of the bowls that i feel turned out really great is the use of glazes with glass in them, these glazes turned out so amazing and look really professional. I LOVE using the wheel, these three bowls have made me love pottery. The use of a wheel is so exciting and being able to keep the bowls crisp and symmetrical is something that i love to do when sculpting usable sculptures. Over all the use of the wheel has only made my love for pottery grow even more.
|
|
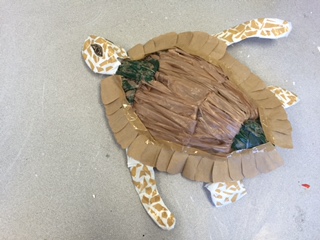
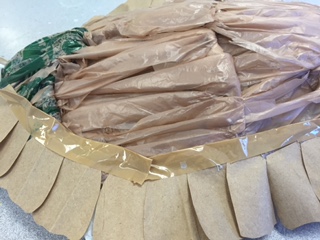
Unconventional materials challenge
What material did you have to work with? How did you overcome the obstacle of using this material? What do you feel is most successful about your piece and what would you change for next time?If you could change this project in anyway what would you have done?
The material i was assigned to work with was plastic bags. Even though i my material was plastic bags i used paper grocery bags, and packing tape . For the construction of the turtle i used thick wire to make a frame, i then covered all the sharp connections of the wire by covering them with masking tape and duct tape. I used hot clue to secure the plastic bags to the wire more tightly but i mostly just weaved the bags around the wire frame to emulate a turtles shell and the shapes within the shell. I over came the obstacle of using this material by thinking of an object i love and wanted to sculpt i also liked the idea that the piece portrayed the message of pollution. This being the fact that the number one cause for sea turtle deaths in the ocean is floating plastic grocery bags (mistaken for jelly fish, and ingested by sea turtles). One aspect that i feel is extremely successful for this piece is the weaving of the plastic bags around the wire. On a turtles shell the shapes are connected but are obviously sectioned off, i tried to emulate this by using the plastic bags in different sections with different directions of weaving. I also achieved this by using different color bags in the shell itself. One thing i would change next time is the overall look of the piece, if the turtle looked more life like i would have enjoyed it more. I wish i had enhanced the colors such as painting the bags or worked with them a little more rather than let the natural colors of the bag show in the piece itself.
|
|
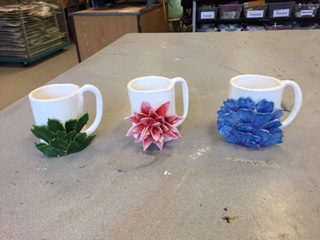
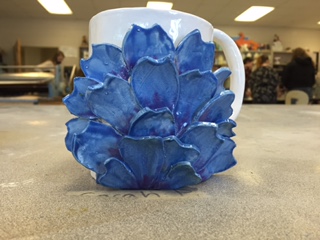
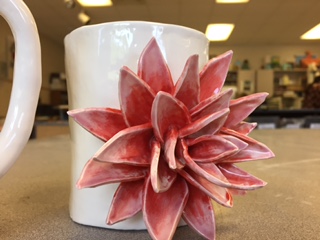
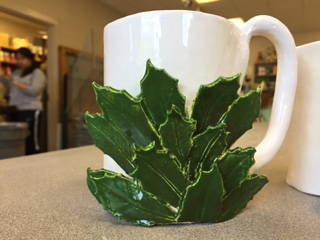
Vessel (in progress)
How does your piece fit into the "vessel" theme? What does it contain? What do you find successful about your piece? What would you want to change if you did it again? How did you come up for your idea? What inspired you the most?
My piece i decided to make was actually a set of three mugs. These mugs fit in the vessel theme because the definition of a vessel is a hollow or concave utensil, as a cup, bowl, pitcher, or vase, used for holding liquids or other contents. The theme around my piece is natural textures, on the first mug a holly leaf was used to make the texture of the blossom, the second was to emulate a pine cone shape, the last was to make a lotus blossom. All mugs play with the idea of texture. I feel my pieces are all successful in the use of texture and concept because of the contrast with fluidity and rigidity of lines. If i was to do this project again i would probably make the mugs a little more different than one another, i feel the first too are a little too similar and would enhance the overall set if the had more of a contrasting nature. I came up with this idea while playing around with imprinting a holly leaf into slab clay, the texture it produced was really cool and i wanted to play with other natural textures similar to it. Natural themes inspired me the most, many of my pieces are derived from natural aspects this is because i find nature extremely inspiring and a worthy muse to convey in my art.
|
|
|
|
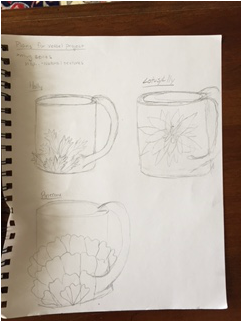
Vessel plans
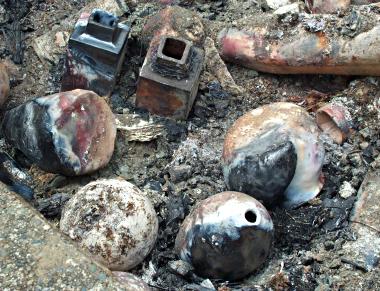
Pit Fire part 2
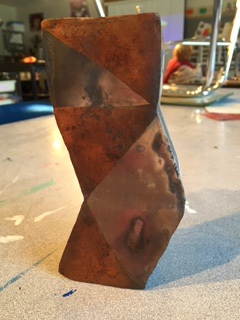
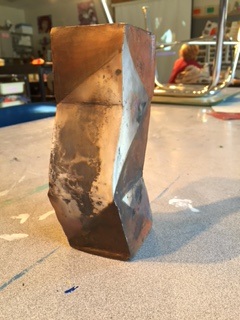
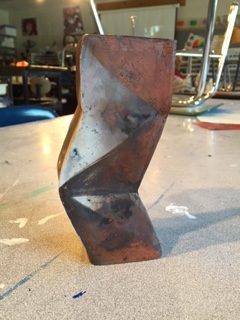
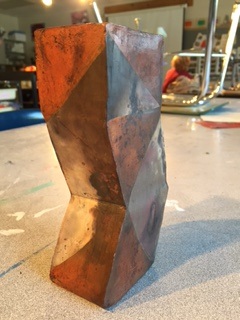
To make this piece was a long process that included many steps. Step 1: Sketching and planning the pit fire piece, i chose to sketch many pieces in my sketchbook and i picked the best option out of all of them. Step 2: design and cut out templates to form the pieces out of slab, i cut out 4 templates that i cut 6 of each to form this three part sculpture. Step 3: i scored and slipped all the pieces together to create the final piece. Step 4: allow to dry slightly and then burnish with a metal spoon to create a smooth texture. Step 5: Applying Terra sigillata which is an ultrarefined clay slip that can give a soft sheen when applied to bone-dry wares and, if polished or burnished while still damp, may give a high gloss. Step 6: fire in bisque firing. Step 7: apply chemicals, paper, fabric, salt and flowers inside a aluminum sagar which will wrap all combustibles inside. Step 8: apply a wax to enhance color and shine. Traditional firings are done very organized and stacked in a kiln with clean air encircling the piece. The pit firing works with the fumes produced by the combustibles to create patterns and color on the pieces. I really enjoyed this process (even though it was long) it was a great way to learn all the steps for pottery as well as a great example of another type of pottery. I am also really proud of the way the piece turned out i never expected it to look the way it does, this is because of the unpredictable nature of the pit fire. I would definitely do this process again, i loved completing the steps to get to then end product and was so excited to see how it turned out.
|
|
|
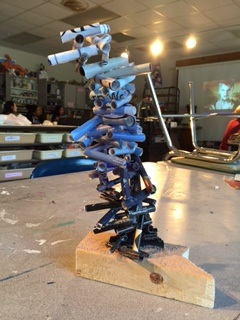
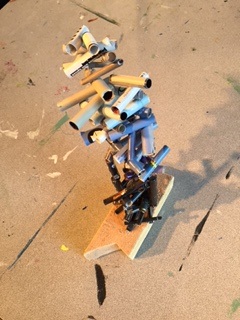
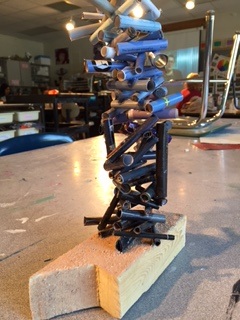
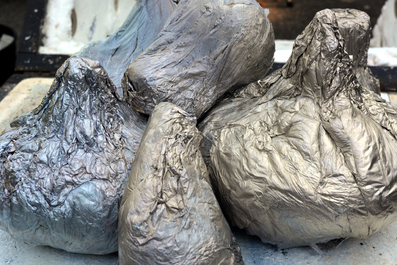
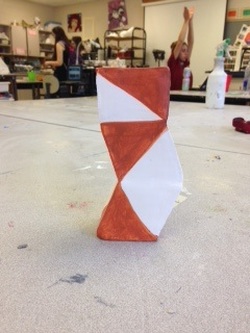
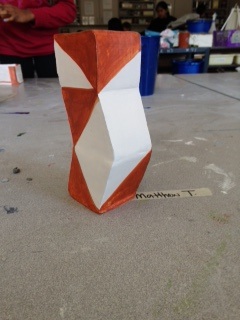
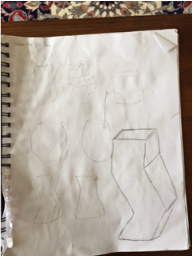
Form challenge
I really enjoyed this project because it was nice to do a small piece. As well this piece was fun because i learned how to manipulate materials other than clay. some things i found difficult about this project was the construction, my piece has broken and fallen over many times so i think more planning with respect to construction and execution would benefit the overall piece. I feel like the base of the piece looks cool with the sand on it, this application was added because the piece ended up looking like a wave so with the help of others we came up with the idea that adding sand would look cool on as the base of the project. i learned how to use an electric saw during this process which was interesting but also a bit scary, i also learned how to have patience while rolling many different magazine beads and patience with the use of a glue gun.
|
|
|
Pit Firing part 1
What is a pit firing? What is a foil saggar? What makes these techniques special?
Pit fire is the process of firing pottery closely packed into a pit or vessel then placed withing the pit are lots of combustible materials such as leaves, paper, fabric, and other chemicals. A foil saggar is completely encircling the piece in aluminum foil to create a small oven around your piece. This allows the piece to absorb the colors produced by the fumes coming from the combustible materials . Pit firing is different to common pottery bisque firing because you are purposely exposing the piece to fumes or other gases produced from combustible materials. As well pit firing is unique in that the artist doesn't know the out come of what the piece will look like.
pottery in the pit
|
Aluminum foil saggar
|
Piece before pit fire
|
|
pit fire plans
|
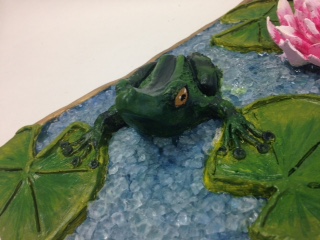
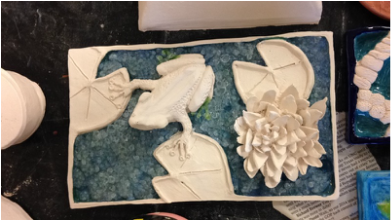
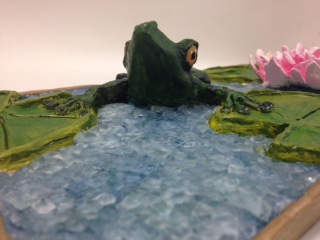
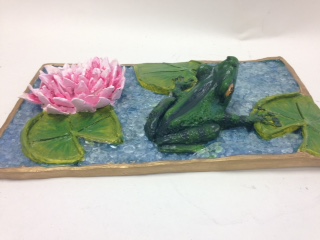
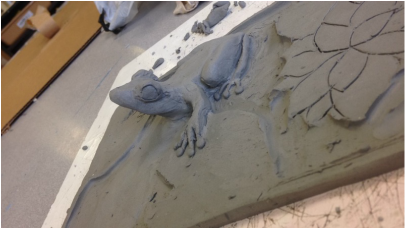
Relief Project Part 2
During the process of making my relief tile i really enjoyed learning the techniques to sculpt extremely realistic natural features. I feel like i was able to capture the shape of the frog well and the theme of the project being relief. This piece was successful in many ways but also was flawed. Next time i would probably change what type of medium i used to paint the piece, by using acrylic paints is was difficult to get the pigment onto the surface of the piece and i would greatly improve from using other kinds of glazes instead. I Had originally planned on making the water as clear as i could but with an unpredictable firing in the glass portion of this project the water is more of a foggy bubbly blue. Even though this is not what i planned i still really like the way it turned out because its different than anything i have seen before. i had also planned on making the lotus flower a little bigger but with an the use of a smaller tool my petals for my lotus ended up being smaller than planned. My mini piece's really helped me to learn about layering within relief. I didn't entirely love my cardboard piece but i enjoyed playing with textures produced from different colors and kinds of cardboard. The mini tile was a great precursor to the main project because i ended up doing a large tile. By learning how to cut into a and build upon clay i was able to fully enhance the level of depth with in the main piece from learning from the mini tile. Some things that i learned while completing this piece was patience, and a way to spin unintentional out comes into really interesting key elements of a piece. The bubbling of the glass was unintentional but i learned from this to go with the flow because i now really like what happened with the glass in the final firing.
During the process of making my relief tile i really enjoyed learning the techniques to sculpt extremely realistic natural features. I feel like i was able to capture the shape of the frog well and the theme of the project being relief. This piece was successful in many ways but also was flawed. Next time i would probably change what type of medium i used to paint the piece, by using acrylic paints is was difficult to get the pigment onto the surface of the piece and i would greatly improve from using other kinds of glazes instead. I Had originally planned on making the water as clear as i could but with an unpredictable firing in the glass portion of this project the water is more of a foggy bubbly blue. Even though this is not what i planned i still really like the way it turned out because its different than anything i have seen before. i had also planned on making the lotus flower a little bigger but with an the use of a smaller tool my petals for my lotus ended up being smaller than planned. My mini piece's really helped me to learn about layering within relief. I didn't entirely love my cardboard piece but i enjoyed playing with textures produced from different colors and kinds of cardboard. The mini tile was a great precursor to the main project because i ended up doing a large tile. By learning how to cut into a and build upon clay i was able to fully enhance the level of depth with in the main piece from learning from the mini tile. Some things that i learned while completing this piece was patience, and a way to spin unintentional out comes into really interesting key elements of a piece. The bubbling of the glass was unintentional but i learned from this to go with the flow because i now really like what happened with the glass in the final firing.
|
|
|
|
|
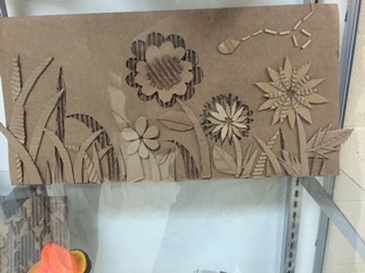
Cardboard piece
|
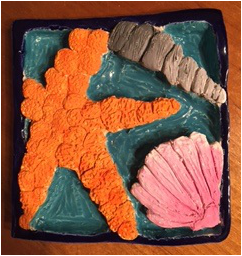
Mini tile project
Relief Project 1
This is my inspiration link to my Pinterest board containing 15 images of inspiration- https://www.pinterest.com/308soccergirl/relief-project/
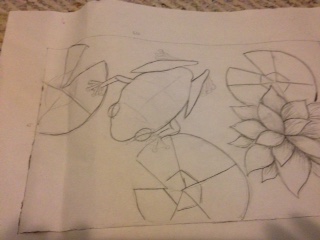
In this relief project i plan to do a 10inch by 6inch clay tile in the relief. I want to focus on the main subject to the frog but use the Lilly pads and Lilly flower to fully show the pond environment. I will carve into the clay tile as well as add onto the tile to give it a full depth of layers. I haven't decided on which type of coloring medium to use but my goal is to use a medium that can show a true range of colors and variations of tones. Hopefully after painting or glazing i can find a way to make the water area of the tile in a way to look like actual water to make the tile look more realistic.
here are my plans and sketch of my relief project -
|

|
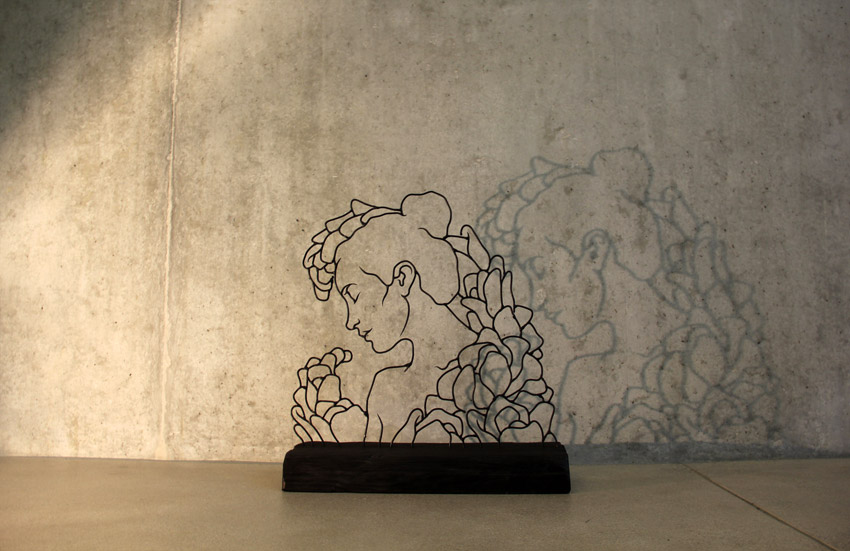
Artist Inspired
Sketches in the Air: Delicate Figures Drawn in the Air with Welded Steel Rods by Gavin Worth
-This artist Gavin Worth makes in the round Sculptures by using re purposed steel rods and wire welded into two dimensional sculptures appear as illustrated line drawings. Gavin was born in Zimbabwe in 1981 but grew up in New Mexico. He is self taught and is commonly inspired by Shakespeare many plays, this is because of his early interest in preforming and the acting world. Gavin creates his creations by painting, drawing, and sculpting. He also has had numerous high profile occasions of celebrating his work for example designing window displays for Tiffany and Co. during valentines holiday, as well as helping Lexus launch its business overseas by designing multiple sculptures, he was commissioned by Ralph Lauren stores, and was nominated for the 2014 TED fellowship. Gavin currently lives in Egypt.
This work is extremely beautiful and thought provoking. I love the use of minimalist lines to portray emotion on the faces of the subjects of the sculptures. My favorite parts of the sculptures is the expressions and body language of the subjects, these tiny movements allow the viewer to portray a feeling or an emotion.Gavin worth inspires me because he is completely self taught but he still creates work that is extremely thought provoking and interesting to the viewer. His drive and his can do attitude inspire me to per sue a field of art i never knew was so interesting, Sculpture.


This is Gavin worth and here is the link to his website http://www.gavinworth.com/index.html
